How I created a door bell with AWS Serverless

Table of Contents
Intro #
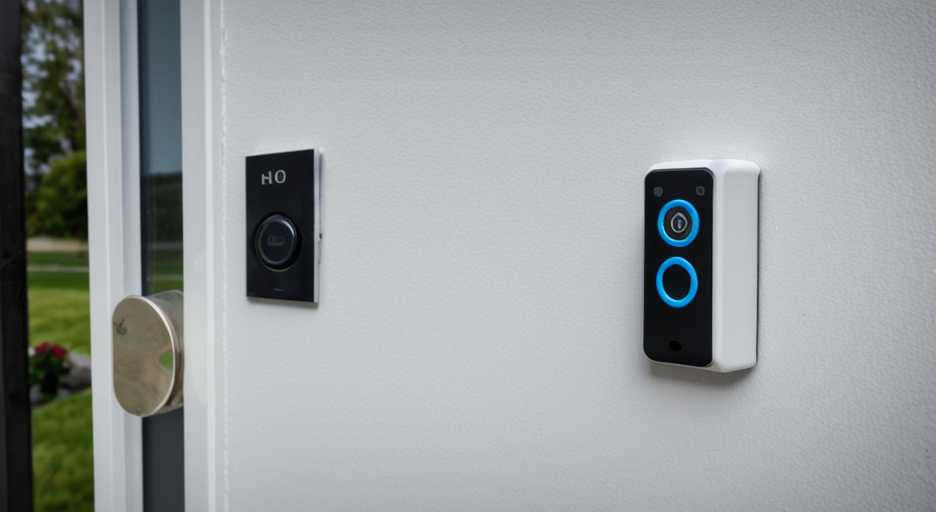
Recently, there was a hackathon at my work place, Wonderkind, and with one of my colleagues, I created a intelligent door bell with AWS Serverless services + a raspberry pi.
Whenever someone clicks on the button of the ‘door bell’, it will capture a image and check through a Amazon Rekognition faces collection to see if the faces on the image are already indexed. And it will send a message to Slack with the scaled image with a watermark with timestamp indicating the number of people on the image and names of people if they are already in the faces collection.
This post describes how we built this project and some of the learning.
Architecture #
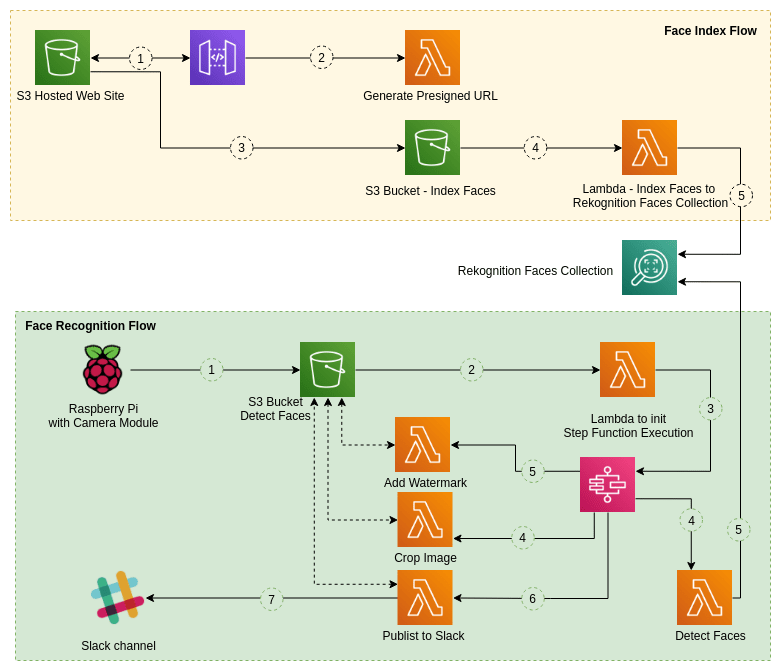
How it works #
There are two main components - Face indexing and face recognition.
Face Indexing #
-
We have created a simple frontend with VueJS which is hosted on a S3 bucket. Here, we asked to upload an image with a face and the name of the person.
-
Once uploaded, we proxy a lambda function via API gateway to create a pre-signed url and using this generated pre-signed url, we upload the image to s3 bucket with the person’s name as a meta data value.
-
Once the image is uploaded to s3 bucket, there is a lambda function triggers which will detect the face in the image and create a entry in the pre defined AWS Rekognition collection (faces collection) with the external id as the name.
Face Recognition #
-
Using a Raspberry pi with it’s camera module, solderless breadboard, and a button, we created the image capturing part when a button is pressed - ’the door bell’.
-
This captured image is uploaded to AWS S3, a lambda function is triggered to initialize Step function execution.
-
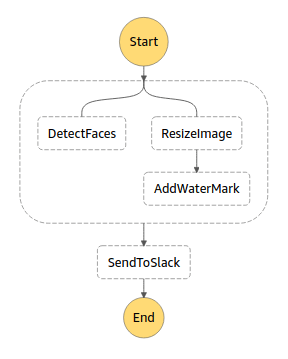
Within the Step function, there are two parallel flows.
-
One flow is to detect the faces of the image and search them in the faces collection. This function will output the total number of faces detected. If there are recognized faces, it will output names of those faces as well.
-
The other flow will resize the image and create a watermark with the timestamp. There are lambda functions used for all these functionality.
-
After completing both the flows, there is another lambda function triggers to compose and send the message to the Slack channel.
Output #
In the Slack channel, output will be as follows:
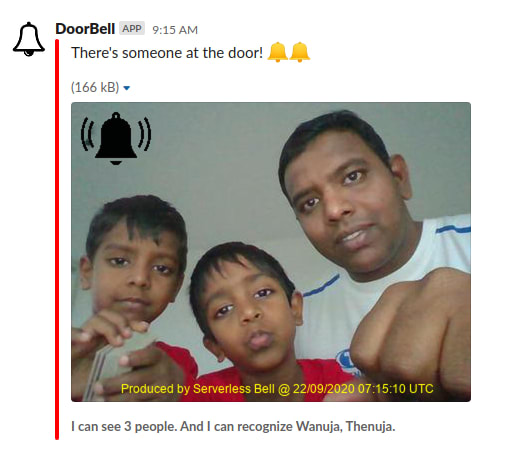
Here, (my sons) Wanuja and Thenuja are already indexed in the faces collection, not me.
Code #
Complete source code can be found at: https://github.com/pubudusj/serverless-bell
How to set up #
You may deploy the stack using AWS SAM framework easily.
Prerequisites:
- AWS SAM cli + AWS profile set up
- npm (to build frontend)
- Slack Webhook URL
Create a Slack App at https://api.slack.com/apps/. Enable ‘Incoming web hook’ and add the created webhook to the workspace choosing a channel. This will generate a webhook url in the format of
https://hooks.slack.com/services/XXXX/XXXX/XXXXXX
Deploying backend #
-
First create a AWS Rekognition collection in a region where you are going to deploy the stack:
aws rekognition create-collection \ --collection-id serverless-bell-faces-collection -
Clone the github repo. This has several directories for different purposes as described below:
- backend - source code needs to be deployed using SAM
- face_index_frontend - source code for face index frontend
- testing - For local testing without using Raspberry pi, you may use this code to test the face recognition functionality. This will upload the provided image similar as Pi uploads the image to s3.
- scripts_in_pi - Simple python script to use within Pi which will capture the image from the camera module and upload to s3.
-
In cli, go to
/backenddirectory -
Run command:
sam build --use-containerThis will build the python functions with necessary dependancies. -
Then, to deploy the resources, run:
sam deploy -gThis will ask you to enter details of the stack to be created in AWS including the stack name, region, Rekognition face collection and slack url.Please make sure you create the stack in the same region as Rekognition faces collection.
-
Once the deployment is done, copy these output values as they are required in the next steps:
FaceIndexHostingS3Bucket, FaceIndexWebsiteURL, GeneratePresignedUrl, GeneratePresignedUrlForTesting, FaceDetectUploadBucketName -
Now goto
face_index_frontenddirectory, where face index frontend source code is located. -
Create new
.envfile copying.env.example. For theVUE_APP_GENERATE_URL_APIvariable, useGeneratePresignedUrloutput value. -
Run
npm installto install required modules and then runnpm run buildto build the project. This will createdistdirectory. -
Then, let’s upload contents of
distdirectory to s3 to be used as a s3 hosted web site. Use value of the outputFaceIndexHostingS3Bucketas the s3 bucket.aws s3 cp dist s3://[BucketName] --recursive -
Now you will be able to access the face index web site using the output value:
FaceIndexWebsiteURL. -
Upload a face image with a name and you will see the face is index in the faces collection.
aws rekognition list-faces --collection-id "serverless-bell-faces-collection"
Within Raspberry pi #
-
Set up Raspberry PI with camera module and AWS profile.
-
Use the example script in
scripts_in_pidirectory to capture and upload image to S3.Replace
bucket-namewith the output valueFaceDetectUploadBucketNameUse relevant gpiozero Button number as per your set up. -
Once captured, you can see the message in your Slack channel.
Local testing without Raspberry pi #
-
Goto the
testingdirectory. -
Create new
.envfile copying.env.example. For theVUE_APP_GENERATE_URL_APIvariable, useGeneratePresignedUrlForTestingoutput value. -
Run
npm installandnpm run serve -
With the provided url, you can access frontend to upload images to detect faces.
-
Once uploaded, you can see the message in your Slack channel.
Some lessons learnt #
-
In Rekognition faces collection,
ExternalImageIdonly allow alpha numeric characters. So to store the names with multiple parts spaces in between, we have to replace spaces with underscores and when retrieving the vice versa. -
When trigger a lambda function from S3 file upload, lambda will not receive the meta data of the uploaded file. So, to retrieve the meta data of the file, need to read the file again.
-
In SAM, it is not possible to use automatically generated S3 bucket names in the policy objects of the function - [reference] ( https://github.com/aws/serverless-application-model/issues/138). Because of this, we had to build the S3 bucket name instead of SAM generated S3 buckets with random names as described in here.
Possible improvements #
- Implement authentication for face index frontends, APIs, Lambda functions.
- Handle failed scenarios in the Step function execution.
- Process
EXIF orientationdata of a uploaded image to get the correct orientation.
Please feel free to try this and let me know your thoughts.
👋 I regularly create content on AWS and Serverless, and if you’re interested, feel free to follow / connect with me so you don’t miss out on my latest posts!
- LinkedIn: https://www.linkedin.com/in/pubudusj
- Twitter/X: https://x.com/pubudusj