How I created a 'physical' alarm to warn me when my servers are down

Table of Contents
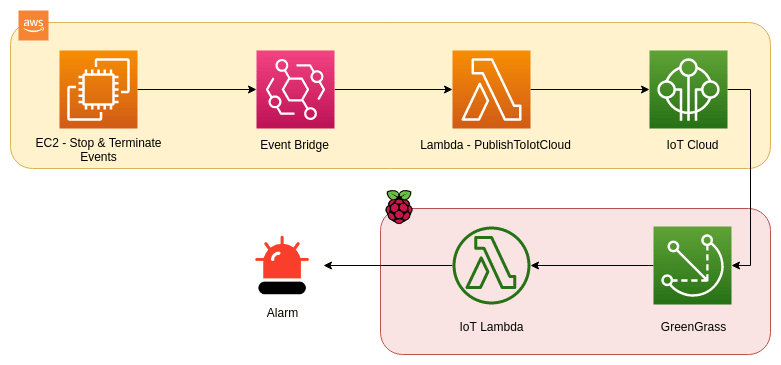
This post contains a weekend project I worked on to create an alarm when my AWS EC2 servers are down. Tools and technologies used: AWS Lambda, EventBridge, Greengrass, Raspberry Pi, Active Buzzer and LED light (as the alarm), GPIO, etc.
Architecture #

How it works #
-
When an EC2 is stopped or terminated, EventBridge will capture the event.
-
EventBrige will trigger the Lambda function (PublishToIotCloud) which publish a message to IOT cloud with the topic ‘alarm’.
-
Within the Greengrass group, there is a subscription for the topic ‘alarm’. Once it receive a message to ‘alarm’ topic, it sends message to Greengrass core within Raspberry Pi.
-
Within Raspberry Pi, Lambda will be triggered, and connected alarm (active buzzer and led light) will fire.
Implementation #
Installing Greengrass #
First it is required to install AWS Greengrass software within the pi. Please refer my other post which will detail all the steps required to install Greengrass within the Pi. Getting started with AWS Greengrass and Raspberry Pi
Set up alarm #
Here I used active buzzer with a LED light as the alarm. Used a breadboard to connect those to pi. Please make sure you keep the GPIO pin numbers for both active buzzer and LED light as those are required in the next steps to configure the lambda. Learn more about GPIO here.
Create services #
I have used AWS SAM to create the required Lambdas and EventBridge rules and targets.
Repository: https://github.com/pubudusj/iot-alarm
Install AWS SAM. Clone above repository and run sam build --use-container and sam deploy -g which will take you through the required parameters. (Please make sure you create your stack in the same region as the AWS GreengrassCore created in the Installing Greengrass section.)
Configure Greengrass Group #
-
Goto AWS IoT > Greengrass > Groups and select the group already created.
-
Goto Lambda under this group and click on
Add Lambdabutton. -
Click on
Use existing Lambdaand search IotLambda and select the lambda function and click Next. -
In the next screen, select the
Alias: Iotdeploymentoption and click finish. -
Once Lambda is created, click on Lambda’s
Edit Configurationand increase theTimeoutvalue upto 20 seconds. Also add belowEnvironment variables: BuzzerPin: [GPIO pin number for active buzzer] LedPin: [GPIO pin number for LED light] -
Next, goto the
Resourcessection of the group and click onAdd a local resource. This is required to configure Raspberry Pi to talk with Greengrass. -
Add below values: Resource Name:
GPIODevice path:/dev/gpiomemGroup owner file access permission:Automatically add OS group permissions of the Linux group that owns the resourceLambda function affiliations: select the same lambda function selected in step 3 and selectRead and write accessand save. -
Once done, goto
Deploymentssection and click onDeploywhich will configure the lambda within the pi. -
If deployment failed, you can log into the pi and try find the issue within the logs files at
/greengrass/ggc/var/log/system/localwatch/localwatch.logor at/greengrass/ggc/var/log/user/[region]/[account_no]/[lambda_function.log]
Configure the trigger events #
-
Goto
Subscriptionssection of the group and click onAdd Subscriptionbutton. -
Select
IoT Cloudas source and for the target, select the IotLambda function under Lambdas section and click on Next. -
In the next view, add Topic filter as
alarm. and save.
Testing #
To test the functionality within AWS IoT console, goto Test section and publish a message adding the topic alarm.
This should trigger the alarm connected to the pi.
Demo #
Create a EC2 instance in the same region as your stack. Once up and running, change the instance state to Stop Instance or Terminate Instance. The alarm should trigger.
Some points to highlight #
-
Whenever the Lambda is modified, need to re-deploy the Greengrass Group.
-
Lambda configurations set up in SAM is not valid for IOT, you need to specifically set up env variables, timeout for IOT Lambda within Greengrass group.
-
You can extent the functionality to any event supported by EventBridge (not limited to AWS events).
-
In the IotLambda function,
time.sleep(1)used to make the light and sound to be more like an alarm. Havingsleepwithin Lambdas are not really recommended. -
For the
IotLambdafunction, I have used Python3.7 as the run time, as Python3.7 is already installed in the latest Raspberry Pi OS (previously called Raspbian). But you may use any Python version by installing it in the Raspberry Pi.
Please feel free to try this and let me know your thoughts.
Keep building. Keep sharing!
👋 I regularly create content on AWS and Serverless, and if you’re interested, feel free to follow / connect with me so you don’t miss out on my latest posts!
- LinkedIn: https://www.linkedin.com/in/pubudusj
- Twitter/X: https://x.com/pubudusj