
How I built a Simple Sprint Dashboard with AWS Amplify

Table of Contents
Intro #
This is how I built a simple sprint dashboard using VueJS and used Amplify for backend, frontend, CI/CD, and for custom domain set up as well. In this post, I would like to share my experience using Amplify and some key lessons learned ;)
This is the first time I used Amplify as well as GraphQL and I was so impressed with the ease of use of Amplify to rapidly build an application. However, there are some limitations I experienced, which I will discuss further in this post.
For the frontend part, I have used the free VueJS theme from Creative Tim and modified as I need . Most of the project setup was done using Amplify CLI, but I have to manually set up a few configurations in AWS console where Amplify doesn’t support yet.
Features #
Authentication and User Management #
For the authentication, I have used amplify auth API. However, I didn’t use the UI presets from Amplify but created custom UI components for login, forgot password, etc. Amplify support Cognito out of the box and it was really easy to configure. I used Cognito user pools to create and authenticate users. I created two user groups - Users and Admins. Registration is not open for public, so admin should create an account for user.
Once the admin created an account for the user, there will be an email sending out with a temporary password (Cognito invite flow). User will be asked to reset the password in their first login.
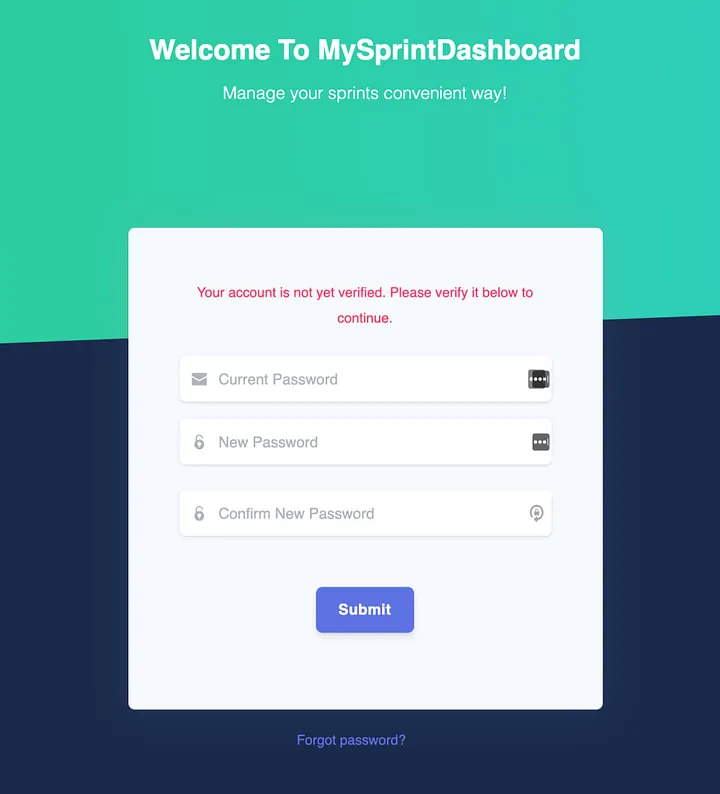
I have created functionality to change the password for logged in user as well as forgot password feature for not loggedin users which use Amplify Auth API under the hood.
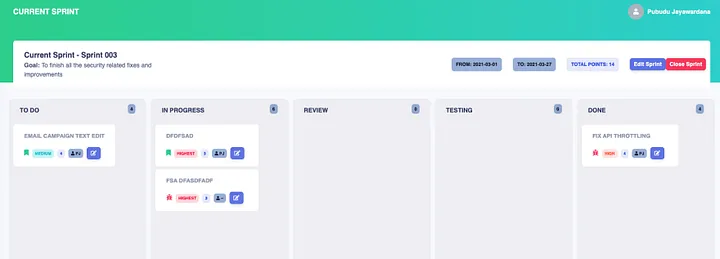
Dashboard, Backlog, Tickets, Sprints #
Once user logged in, they have access to the dashboard which has summarized data about the current sprint and his/her own tasks.
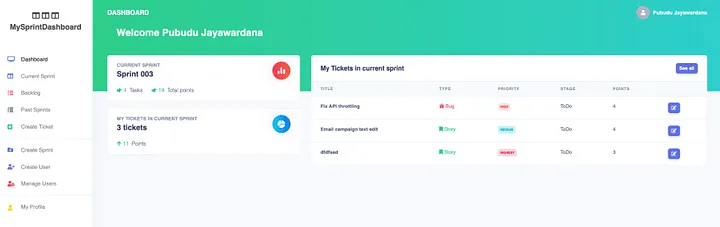
They can add, edit, move tickets between sprints. Also, users can move the tickets between different stages of the current sprint, namely - todo, in progress, review, testing, and done.
To store all these data, I used Amplify GraphQL API. Setting this up is a matter of minutes using Amplify CLI and documentation has good examples of how to model the data structure with different relationships. Once we provide our GraphQL schema, Amplify will automatically create all the DynamoDB tables, indexes, GSIs and it also generates all the code we need to communicate with GraphQL service (queries, mutations and subscriptions). This is really handy and I only had to do a minor modification to the generated code.
Here is my graphql definition which has 1:many and many:many relationships.
type User @model
{
  id: ID!
  firstname: String
  lastname: String
  department: String
  designation: String
  verified: Boolean
}

type Sprint @model {
  id: ID!
  title: String!
  description: String
  startAt: Int!
  endAt: Int!
  isCurrent: Boolean!
  archived: Boolean!
  createdBy: User! @connection
  tickets: [SprintTickets] @connection(keyName: "bySprint", fields: ["id"])
}

type Ticket @model {
  id: ID!
  title: String!
  description: String
  points: Int
  priority: String!
  type: String!
  status: String!
  reportBy: User! @connection
  assignee: User  @connection
  sprints: [SprintTickets] @connection(keyName: "byTicket", fields: ["id"])
}

type SprintTickets
  @model(queries:null)
  @key(name: "bySprint", fields: ["sprintId", "ticketId"])
  @key(name: "byTicket", fields: ["ticketId", "sprintId"]) {
  id: ID!
  sprintId: ID!
  ticketId: ID!
  ticket: Ticket! @connection(fields: ["ticketId"])
  sprint: Sprint! @connection(fields: ["sprintId"])
}
Admin specific features #
Admin users have more functionality than normal users. They can create new users and promote existing users as admins as well.
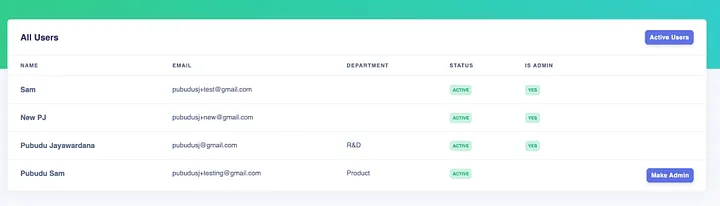
To restrict this functionality, I have used Admin Queries API. Amplify provides set of HTTP APIs to interact with Cognito user pools for example to create user, delete user, get all users etc. It is possible to allow access to these APIs only to certain user groups in the Cognito pool easily (in our case, only to ‘Admin’ users).
Admins also can create sprints, close sprints, edit sprints. To restrict normal users perform these activities, I simply use the user group values provided by Auth.currentAuthenticatedUser() method.
Lambda Triggers #
Lambda triggers are a great way to set up custom functionality in authentication flow. Amplify provides this with few simple configuration options.
In this project, I have set up post-confirmation trigger. When the user confirms his/her account, I add the user to the ‘Users’ group.
Hub #
I found this feature really interesting where we need to communicate with different components of the same application. Hub is a simple pub-sub implementation provided by Amplify out of the box.
One of the instances I used Hub in this project, is to fetch data from API when tickets are moved between sprints. It was easy to set up dispatchers and listeners with channels without complex parent-child reactive communications in Vue.
Dispatcher:
Hub.dispatch("SprintsChannel", {
  event: "ticketMoved",
  data: {},
  message: "",
});
Listener:
Hub.listen("SprintsChannel", (data) => {
  if (data.payload.event == "ticketMoved") {
    this.fetchData();
    this.fetchBacklogTickets();
  }
});
Continuous Deployment #
We can easily set up CD functionality in Amplify console. Here, for this project, I have set up CD, where each time I pushed to ‘master’ branch of the repository, it will build both frontend and backend and deploys automatically.
The nice thing is we can set up different branches for different environments easily. This will be quite handy when we have prod, testing, staging environments, so we can deploy to separate frontends/backends with different branches.
Custom Domains #
For this project, I used a custom domain https://dashboard.pubudu.dev. This can be arranged in Amplify console with few clicks. Amplify by default provides a domain but we can always add our own.
Demo #
You may create an account and play around with my project. Login with the below Admin credentials and create your own user, and promote the newly created user as an admin to use the full functionality.
- https://dashboard.pubudu.dev
- username: pubudusj@gmail.com
- password: admin123#$
You can find the source code here in Github .
List of functionality #
- Login, verify account, forgot password
- View Dashboard, current sprint, backlog, passed sprints
- Create, edit, close sprints (admin only)
- Create, edit tickets
- Move tickets between sprints, backlog
- Move tickets of the current sprint to different stages.
- Modify own profile information, password change
- Create (invite) a user (admin only)
- Promote normal user to admin (admin only)
Some key points to note (Lesson learned) #
-
Although it is a best practice to use a single table in DynamoDB, Amplify/GraphQL api doesn’t support it yet. But it creates a
__typenamecolumn in all the tables which seems to be a sign that this will be supported soon (?) -
Invite user functionality is not yet available with Amplify by default. Here, I had to use a custom method to use Cognito’s
adminCreateUserfunctionality in Admin Queries. Also, when user first login, his/her account will be inNEW_PASSWORD_REQUIREDstate which is not considered as a confirmed user (yet). So, I had to check for this state and provide the password change form to the user to update the password in the first login. -
Since user invite functionality is not yet available with Amplify, I had to modify the user invite message in Cognito manually.
-
As of now, we can grant permission to a specific user group to access all the admin APIs. We cannot specify/restrict different user groups for different APIs.
-
When we have many-to-many relationships in our data models, it will be messy to use only two tables. So, best option is to use 3rd table to maintain the relationship. I used
SprintTicketsDynamoDB table for this purpose and@model(queries:null)flag in the definition as this table is not used to query directly.
Useful Links/Resources #
- Amplify & VueJS example application
- Amplify libraries for javascript
- Narder Dabit’s youtube channel with lot of Amplify resources
- AWS Amplify blog posts
I would like you to play around with my project and provide feedback. I am not so strong in the frontend, so I believe there are definitely better ways to implement these features. 😄
Keep building… Keep sharing..!
👋 I regularly create content on AWS and Serverless, and if you’re interested, feel free to follow / connect with me so you don’t miss out on my latest posts!
- LinkedIn: https://www.linkedin.com/in/pubudusj
- Twitter/X: https://x.com/pubudusj