How I created a Photo Booth with AWS Serverless
Table of Contents
Intro #
This is how I built a photo booth application with AWS Serverless services.
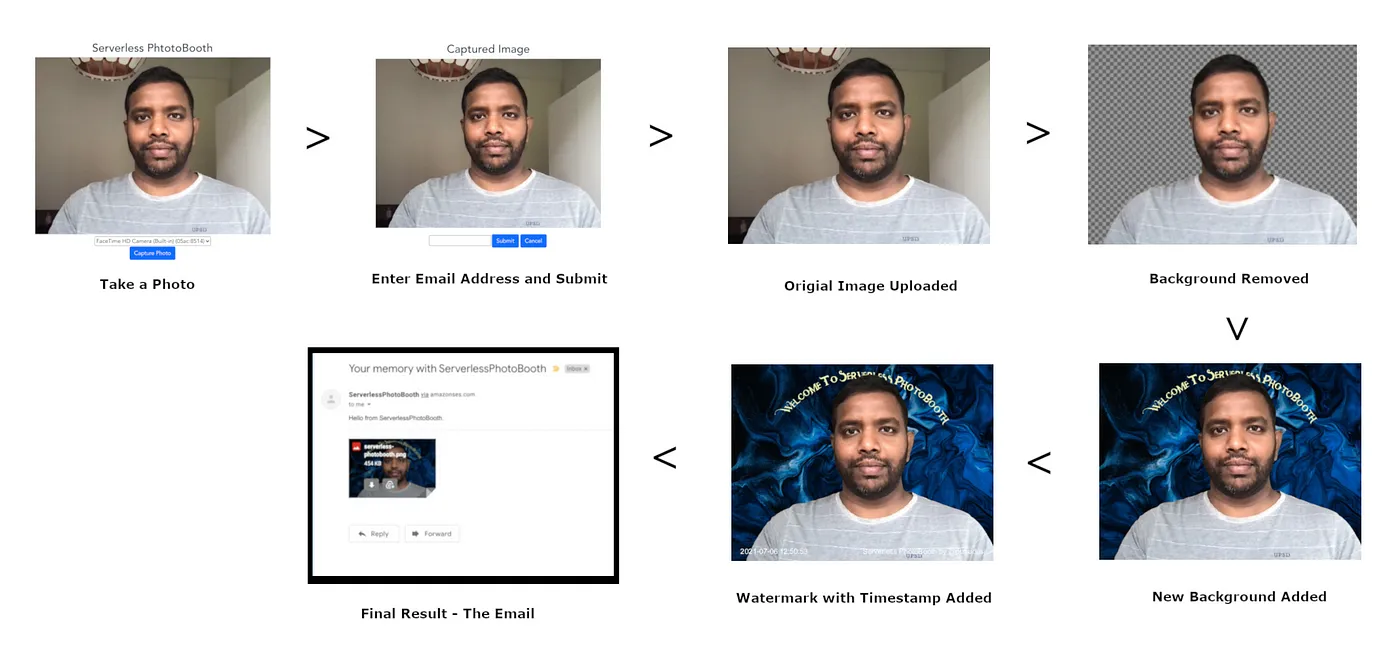
Once user capture an image and provide an email, background of the image is removed and new background applied and watermark with timestamp will be added. Then the image will be emailed to the given email address.
Below tools and technologies are used to built this.
Backend:
- AWS Lambda with runtime Node.js
- Step Function
- S3
- SES
- remove.bg API
Frontend:
- VueJS
- vue-web-cam plugin
- Hosted on Amplify web hosting
IAC:
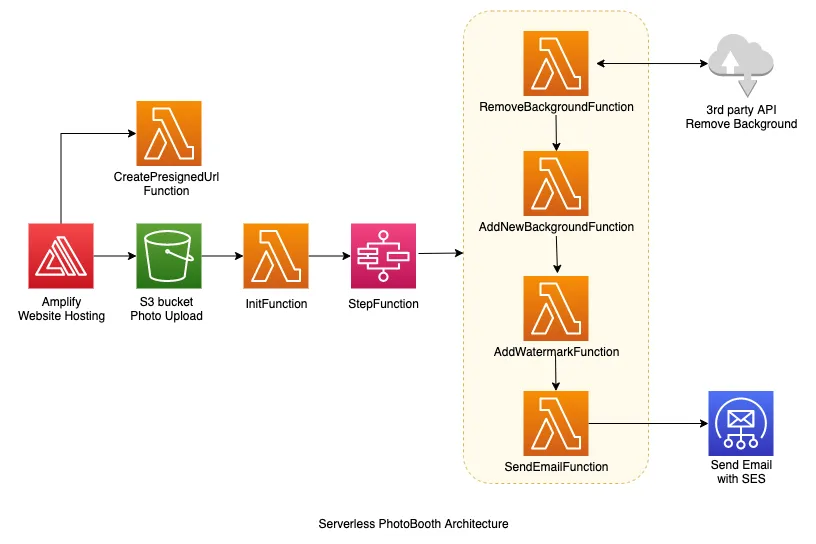
Architecture #
How It Works #
-
In the frontend VueJS app (hosted in Amplify), first a image will be captured with the email address.
-
Then the app will request for pre-signed url.
-
Captured image will be uploaded to S3 with the pre-signed url and the email address as a meta data.
-
Once the image is uploaded, Init lambda function will be triggered to initialise step function execution.
-
Within the Step Function execution, first the background of the image will be removed. For this, I use remove.bg external service.
-
Then, a new background will be applied to the image. This background must be in the ‘backgrounds’ path of the S3 bucket.
-
As the next step, watermark will be added with the timestamp.
-
Finally, the image will be sent to the given email address using AWS Simple Email Service (SES).
How to set up #
Prerequisites #
- AWS cli
- Serverless Framework cli
- yarn & jq installed
- Create a free account at remove.bg and generate a API token.
- Set up and verified SES send email address
Deployment #
-
Clone the repository: https://github.com/pubudusj/photo-booth
-
Copy
.env.exampleto.envand fill in with the appropriate values. -
Run
make install && make deploy
This will create the backend stack and make the frontend deployment bundle ready.
Frontend #
-
Once step 3 above is finished, you can deploy the frontend code in
frontend/dist/frontend.zipeasily with Amplify web hosting. Of course if you use amplify, you can configure your own custom domain quite easily as well. -
If you need to run the frontend in local, navigate to frontend directory and run
yarn run serve
To Delete the stack #
To remove the backend, run make down.
** Make sure the s3 directory created in the stack is empty before run this command.
Demo #
You may check the live demo at https://photobooth.pubudu.dev
Key points/Lessons learnt #
-
Here I used remove.bg external tool to remove background, because it doesn’t need for example green background to extract the foreground objects. I don’t have any affiliation with this service and there are lot of other alternatives as well. Please select any service you prefer and you will need to modify the
removeBackgroundlambda accordingly. -
I have used Step Functions general workflows here, but using express workflow also a good option.
-
I have NOT implemented any error handling in this project since this is just a POC, but in general, you need to address failure scenarios. Refer error handling with Step Functions here.
-
This is the first time I used Serverless Optimize Plugin and surprised how easy it is to bundle the packages only relevant to each lambda functions.
-
As the email service, I have used AWS’s own Simple Email Service (SES). However, you need to first verify your sending email address in order to send emails to any address. This can be done with a support request. Optionally you can use any other email service provider and you have to modify the
sendEmaillambda accordingly. -
In this project, I don’t use any database to record the data that goes through the system. I use s3 object meta data to record the email address entered by user to send out the email.
-
vue-web-cam is simply awesome plugin for VueJS to get camera input into your application. You have option to select the preferred video source if you have multiple.
Your valuable feedback on this project is mostly welcome! I would like you to play around with this and if you have any questions or general comments, please reach out to me via LinkedIn, Twitter or Github.
Keep building, keep sharing!
[Header image by Kevin Grieve on Unsplash]
👋 I regularly create content on AWS and Serverless, and if you’re interested, feel free to follow / connect with me so you don’t miss out on my latest posts!
- LinkedIn: https://www.linkedin.com/in/pubudusj
- Twitter/X: https://x.com/pubudusj