
How to create a simple OTP service with AWS Serverless services

Table of Contents
Intro #
This post describes how to implement a simple One Time Password (OTP) system with AWS Serverless services which can be used as a part of two step verification.
Below tools and technologies used to build this application.
- AWS Lambda
- API Gateway
- DynamoDB
- Simple Email Service - SES
- Amplify Web Hosting
- VueJS for frontend
- Deploy with AWS SAM
Architecture #
How it works #
-
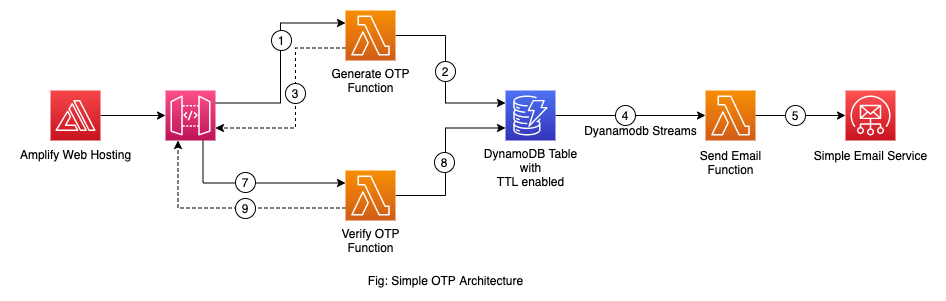
In this scenario, I used a login form, which is developed with VueJS and hosted using Amplify static web hosting.
-
User will enter their email and password and once the credentials are validated, an API endpoint is called to execute “Generate OTP” Lambda function which generates a 6 digit code along with a session id.
-
Once the code and session id is generated, “Generate OTP” Lambda will save these data into a DynamoDB table.
-
Then only the session id will be returned as the response of the API end point.
-
DynamoDB streams are enabled in the table. So, once the data are saved, it will trigger the “Send Email” Lambda function.
-
Within the “Send Email” Lambda function, it will call the Simple Email Service (SES) to send out an email with the generated code to the email address provided.
-
Meanwhile in the frontend side, once the session id is received to from the API, 2nd form is presented to enter the code, which is emailed to the given address.
-
Once user enters the code and submit, it will validate the code along with the session id using another API gateway endpoint which proxy to “Verify OTP” Lambda function.
-
In “Verify OTP” Lambda function, it query the DynamoDB table with the given session id and code and returns the success or error responses.
Key points/Lessons learnt #
-
Here I enabled DynamoDB TTL to delete the entries after specific time to prevent fill out the table very quickly. However DynamoDB will not delete your record immediately when the TTL is expired. It is deleted eventually and AWS only guarantees it to be deleted within 48 hours. Because of this, when verifying the OTP code, it has to consider the same “expiredAt” field which used to set TTL.
-
When design the DynamoDB table, I used sessionId + OTP code as a primary key to easily query the required record. So, when verifying the code, I query by primary key with this combination in the DynamoDB table.
-
When using DynamoDB steam as a trigger for Lambda, it get triggers for all the DynamoDB events (ex: insert, delete, update). So, within the Lambda function, had to filter out only the INSERT events using “eventName” of the record.
-
To send out emails, I have used AWS’s own Simple Email Service (SES). However, you need to first verify your sending email address in order to send emails to any address. This can be done with a support request.
-
Here, I used Amplify static web hosting to host the frontend of the application. I have used Amplify features - the auto deployments when Github repository modified and custom domain name set up only with few button clicks.
-
I have used AWS SAM to deploy the backend resources. The expiry time of the OTP and no of digits in the OTP code can be configured at the deployment time.
How to set up #
Prerequisites #
- AWS cli
- AWS SAM cli
- Set up and verified SES send email address
Backend #
-
Clone the repository: https://github.com/pubudusj/simple-otp
-
Run
sam init && sam deploy -g
After providing your stack information and AWS environment parameters, this will create the backend stack. Copy the ApiBaseUrl output value.
Frontend #
-
Copy the .env.example into .env file and add the ApiBaseUrl value as VUE_APP_API_BASE_URL.
-
You may zip the whole frontend directory and use that in Amplify web hosting, or authorise your GitHub repository to automatically deploy the application when a git push is made.
-
If you need to run the frontend in local, navigate to frontend directory and run
npm run serve
Delete the stack #
To remove the backend, run sam delete.
Demo #
Demo version of this application is available at : https://simple-otp.pubudu.dev/
Please feel free to try this out and let me know your thoughts.
Keep building, keep sharing!
👋 I regularly create content on AWS and Serverless, and if you’re interested, feel free to follow / connect with me so you don’t miss out on my latest posts!
- LinkedIn: https://www.linkedin.com/in/pubudusj
- Twitter/X: https://x.com/pubudusj